Servos
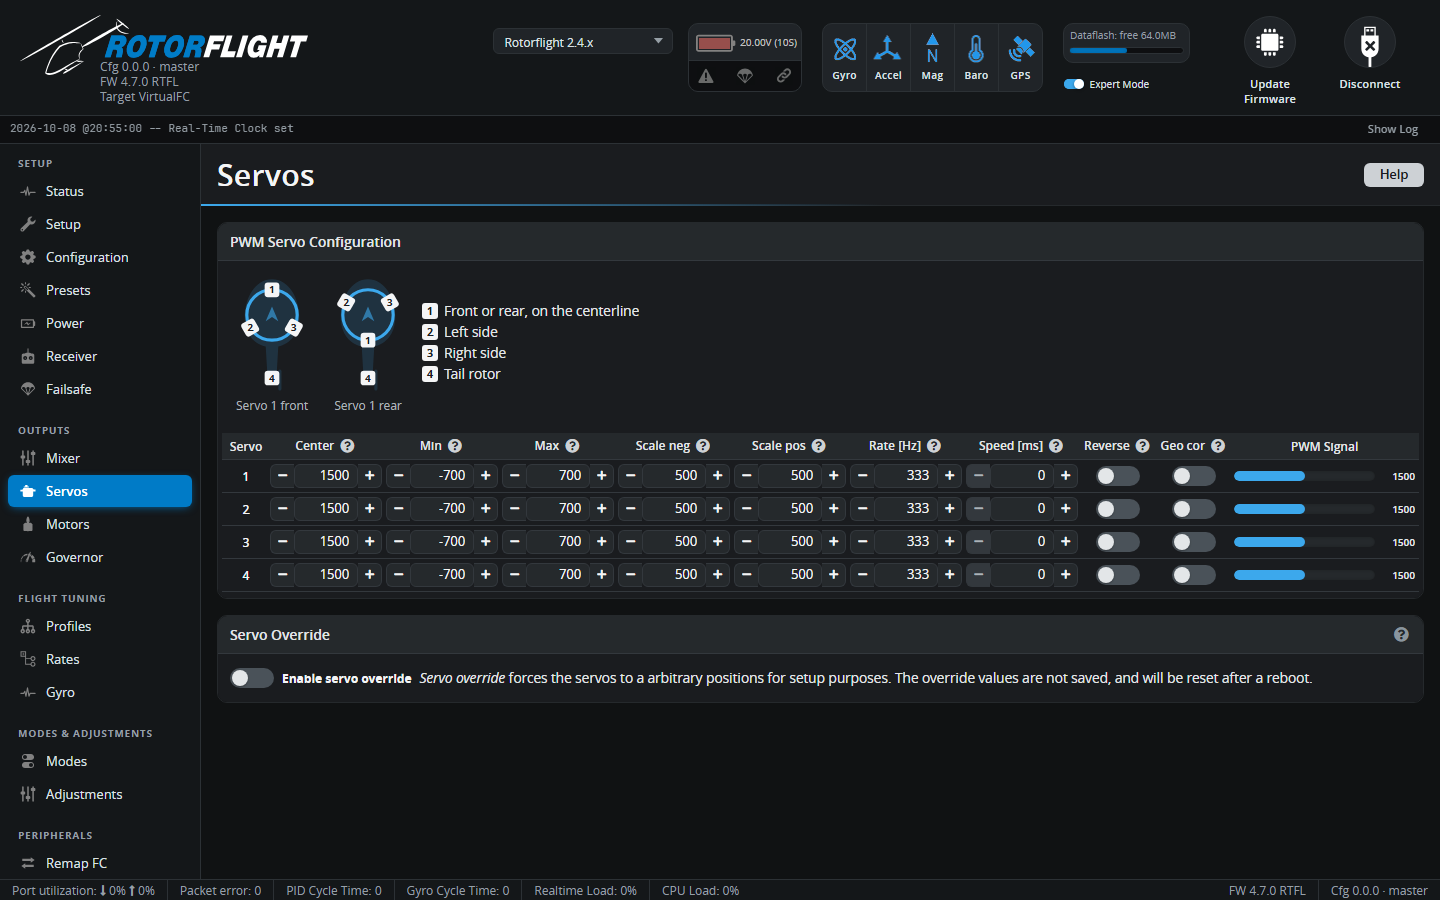
Electrical setup for each servo output: centre, travel, scaling, update rate and direction.
Step-by-step
For the full procedure -- centring, direction and calibration -- see Servo Setup.
Check the Rate and Center before plugging servos in
A wrong update rate can burn out a servo, and narrow-band tail servos can be driven past their end stops at the wrong centre. Set both first, then connect the servos.
The diagram at the top shows which output goes where on the swashplate (the same as on the Mixer tab).
PWM Servo Configuration
| Column | Meaning |
|---|---|
| Center [µs] | The pulse that puts the servo arm level. Start from the servo's neutral -- 1520 for most cyclic servos, 760 for narrow-band tail servos -- then fine-tune so the arm is exactly level. |
| Min / Max [µs] | Travel limits each side of centre (for example -700 / +700). Use them to stop the arm or linkages binding at the extremes. With a 760 µs servo use about -350 / +350. |
| Scale neg / Scale pos [µs] | How far the pulse moves for a given commanded angle, each side of centre. 500 suits 1520 µs servos (about 10 µs per degree) and 250 suits 760 µs servos. Adjust one side so the arm moves the same angle each way -- see calibrating servos. |
| Rate [Hz] | Pulse rate. Check the servo's data sheet: typically 333 Hz for digital cyclic servos and 560 Hz for narrow-band tail servos. Analogue servos must be 50 Hz. Needs a reboot. |
| Speed [ms] | Slows the servo down: the time for 60° of travel. 0 = no limit. Only for things like retracts -- leave flight servos at 0. |
| Reverse | Reverses the servo. Use it so that every servo moves the right way (see below). |
| Geo cor | Geometry correction: compensates for the servo arm moving in an arc, so the swashplate moves linearly near the ends of travel. Use the same setting for all swashplate servos. Not for linear servos. |
| PWM Signal | Live output, in µs. |
The tab warns you if the limits, scales, rates or geometry correction look unusual, or if a centre close to one end limits how far the servo can travel.
Servo direction
Enable the override and move each servo's slider to a positive angle. For the swashplate servos (1-3), the servo arm must move up, towards the swashplate. If it moves down, tick Reverse. Set the tail servo's direction on the Mixer tab, not here, once the tail is linked up.
Bus Servo Configuration
With S.BUS Output or F.BUS master enabled on the Configuration tab, a second table configures bus servos (outputs 9-26). Each has a Source:
- Mixer -- driven by the flight controller's mixer, like a PWM servo. The default for the first 8 bus outputs.
- RX -- passes a receiver channel straight through, for accessories such as lights or a winch.
See FBUS Master.
Servo Override
Enable servo override shows a slider per servo, to move it to an exact angle from the Configurator. Overrides aren't saved, are cleared on reboot, and block arming while on.